02 Aug 2023
Intel VTune Profiler is a tool for analyzing the performance of an
application/system. VTune has a myriad of analysis options – hotspots,
architectural bottlenecks, memory bandwidth measurement and so on. For a
general primer on VTune, please refer to the VTune documentation.
We have used VTune extensively to optimize our high-performance
hashtable.
VTune offers both command line and GUI features. However, most of our
development is done on cloudlab infrastructure and we typically use a remote
VTune setup, where a collector collects all the data on the remote cloudlab
node and displays it locally on a nice GUI.
One of the frequent problems we have seen with some versions is the inability
to start microarchitectural exploration due to sep driver not being
loaded/installed properly on the remote node, which seem to have disappeared
with the latest version.
Installation
Typical setup involves installing a VTune profiler on the local machine and
connecting through ssh to the remote host where the application we want to
profile runs. I have tested this setup on a MacBook Pro (M2) running MacOS
v13.4.1 (c). However, the same steps should work on a Linux machine as well.
- Download the VTune standalone version (based on the local node’s OS)
- For MacOS, this is the latest version (at the time of writing)
wget https://registrationcenter-download.intel.com/akdlm/IRC_NAS/99795f2e-81d5-4329-a471-72daa0ce35d7/m_oneapi_vtune_p_2023.2.0.49484.dmg
- Follow the instructions by launching the installer
- For Linux, here is the script from the official
page
wget https://registrationcenter-download.intel.com/akdlm/IRC_NAS/dfae6f23-6c90-4b9f-80e2-fa2a5037fe36/l_oneapi_vtune_p_2023.2.0.49485.sh
sudo sh ./l_oneapi_vtune_p_2023.2.0.49485.sh
Running
-
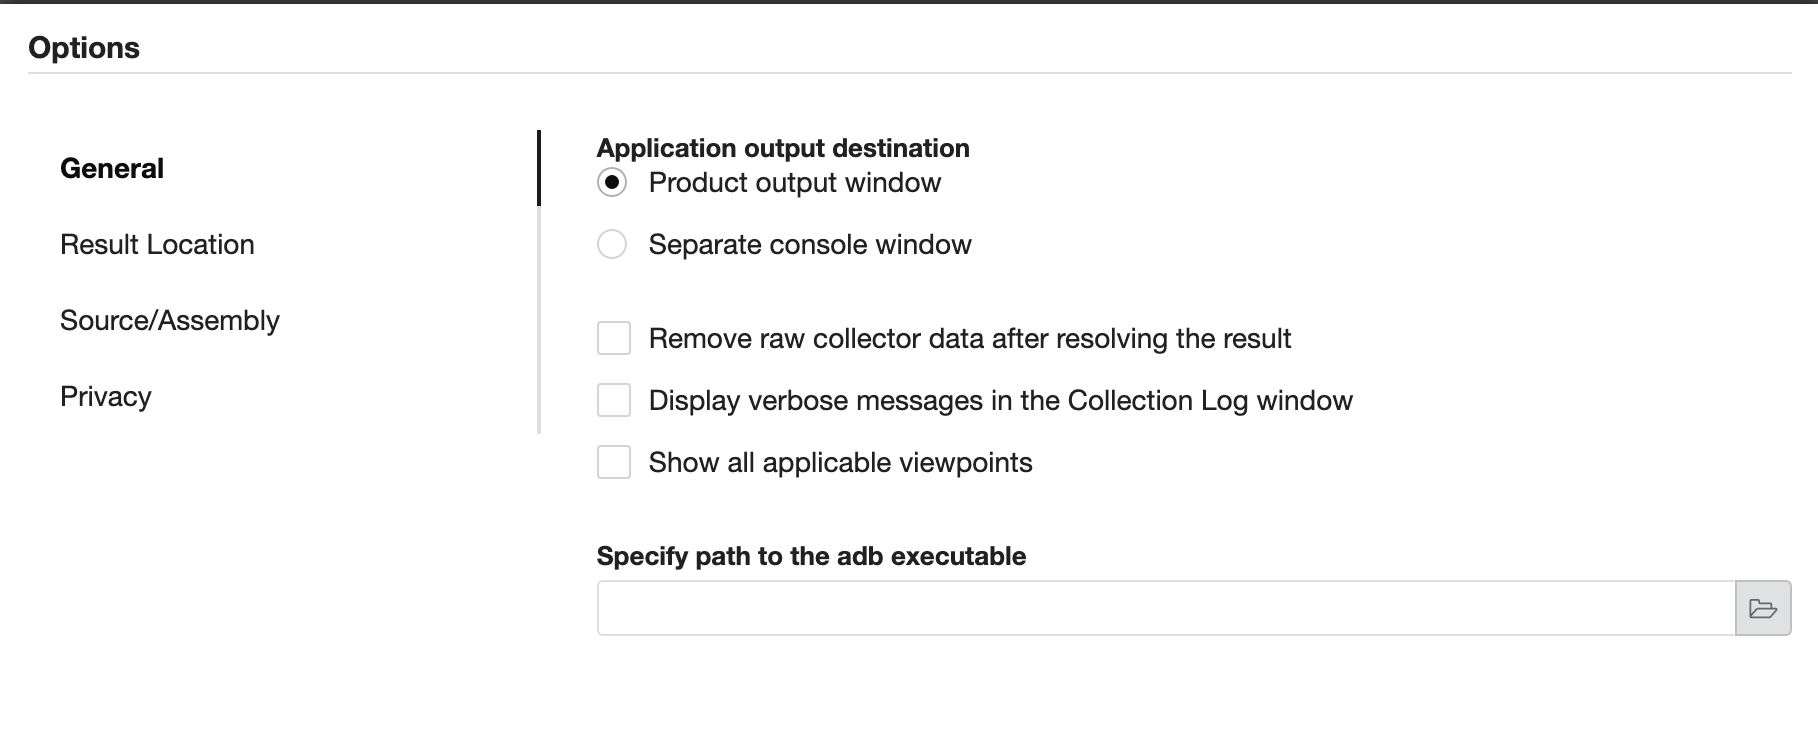
After installation, one can launch the vtune-gui to start the VTune profiler.
-
Select “Application output destination” to Product Output Window in the
settings to see the application output.
- In the “Configure Analysis” tab pick the Remote Linux (SSH) option and
key in the destination in the ssh format.
-
Along with this, pick the desination path for the “remote installation directory”
-
Under the “Launch application” pane, enter the application and command line
args that you want to profile.
Using the VTune API
The above setup is sufficient for normal profiling. However, if you want to use
the VTune API to insert profiling markers on your application or to control
when to start/stop profiling from the application itself, you need a full
installation on the remote node as well that contains the necessary header
files and libraries. Follow the same installation steps for installing VTune on
the remote Linux machine. More details on how to use the API is available on
their official
documentation.
25 Nov 2022
AMD introduced Secure Encrypted Virtualization (SEV) in 2016 and has already
seen several reincarnations - SEV-ES (encrypted state), and SEV-SNP (secure
nested paging). In 2022, AMD introduced Secure Virtual Machine Service Module
(SVSM) that can be used to implement secure services for a confidential guest.
You can read more about SVSM in their official (draft)
specification.
Hardware
AMD SEV-SNP and SVSM are avaible on AMD’s third generation EPYC processors
(Milan). The list of milan processors are available in the Wikichip
page.
Availability in the research cloud infrastructure
Both Cloudlab and Chameleon cloud that are widely used for academic research
has servers equipped with AMD EPYC Milan processors that can be used for
running confidential virtual machines with AMD SEV-SNP/SVSM.
- Cloudlab’s Clemson cluster has R6525
nodes
with AMD EPYC 7543.
- Chameleon’s TACC cluster has R6526
nodes
with AMD EPYC 7763.
Software stack
The official implementation of SVSM specification is available at
https://github.com/AMDESE/linux-svsm
SVSM needs a modified Qemu, open virtual machine framework (OVMF), host and
guest Linux kernel to operate. All these changes would be eventually
upstreamed. Right now, they are hosted on AMD’s github.
- Host Linux Kernel
- Qemu
- OVMF
- Guest Linux Kernel
Enabling SNP on Dell PowerEdge servers
Dell PowerEdge R6525 servers equipped with AMD Milan CPUs can be used to run
SNP enabled confidential virtual machines with SVSM. Below are the steps to
enable SNP on PowerEdge systems (This setup is tested under R6525 servers with
both AMD EPYC Milan 7543 and 7763 processors).
1) Upgrade BIOS to the latest version (v2.8.4 as of Nov’22)
- Refer to the BIOS manual
for PowerEdge R6525 or the appropriate manual for your server.
2) Modify the following BIOS options
- Under Processor settings, enable the following
- Secure Memory Encryption (SME)
- Secured Nested Paging (SNP)
- SNP Memory Coverage
- Kernel DMA Protection
- IOMMU Support
- Set Minimum SEV non-ES ASID >= 1
- Under Boot Settings
- Switch Boot mode to UEFI - This is non-trivial. Read the manual to enable
all the necessary options such as Boot order.
3) After enabling, make sure the following model-specific registers (MSRs) have
the same value across all CPUs (From https://www.amd.com/system/files/TechDocs/56860.pdf#page=66).
- All MTRRs, IORR_BASE, IORR_MASK, TOM, TOM2
- There is a helper script that dumps these MSRs.
4) If everything is initialized correctly, then you should see the following
messages on dmesg.
[   48.518199] SEV-SNP: RMP table physical address 0x0000000015e00000 - 0x00000000566fffff
...
[  178.878110] ccp 0000:22:00.1: sev enabled
[  182.989520] ccp 0000:22:00.1: SEV-SNP API:1.52 build:4
[  183.012703] SEV supported: 478 ASIDs
[  183.012704] SEV-ES and SEV-SNP supported: 31 ASIDs
...
Running SVSM
Follow the official
documentation from
linux-svsm repository for building SVSM and the necessary dependencies (Host
kernel, Qemu, OVMF, Guest kernel).
When FEATURES=verbose is enabled, you can observe the serial log while
booting an SNP guest.
> All 17 firmware config files read.
> Starting SMP for 0 APs:
Getting attestation report from SNP guest
If something is not working as expected, file an issue under the official
github repository.
31 May 2021
Notes on how to compile and install bcc and bpftrace from sources on Ubuntu 18.04 with a recent HWE enabled kernel v5.4.0-73-generic
- Enable BPF related kernel configs. The ubuntu kernel comes pre-built with BPF configs. Enable these configs
CONFIG_BPF=y
CONFIG_BPF_SYSCALL=y
# [optional, for tc filters]
CONFIG_NET_CLS_BPF=m
# [optional, for tc actions]
CONFIG_NET_ACT_BPF=m
CONFIG_BPF_JIT=y
# [for Linux kernel versions 4.1 through 4.6]
CONFIG_HAVE_BPF_JIT=y
# [for Linux kernel versions 4.7 and later]
CONFIG_HAVE_EBPF_JIT=y
# [optional, for kprobes]
CONFIG_BPF_EVENTS=y
# Need kernel headers through /sys/kernel/kheaders.tar.xz
CONFIG_IKHEADERS=y
- Install build deps
# For Bionic (18.04 LTS)
sudo apt-get -y install bison build-essential cmake flex git libedit-dev \
python zlib1g-dev libelf-dev libfl-dev
- Install Googletest and googlemock
git clone https://github.com/google/googletest.git
mkdir build && cd build;
make -j
sudo make install
- Install llvm-12
wget https://apt.llvm.org/llvm.sh
chmod +x llvm.sh
sudo ./llvm.sh 12
- Update alternatives to point to v12
wget https://gist.githubusercontent.com/arkivm/e3f2dec38ef258d0fa1a23ebd4342a33/raw/92f0e73d2558402b7316021c1ab408b30e534de6/update-alternatives-clang.sh
./update-alternatives-clang.sh <version> <prio>
- Install
bcc
- Without a special commandline (
LLVM_SHARED), you may likely encounter this issue
- Use the cmake flags as described here
git clone https://github.com/iovisor/bcc.git
mkdir bcc/build; cd bcc/build
cmake .. -DCMAKE_BUILD_TYPE=Debug -DCMAKE_INSTALL_PREFIX=... -DENABLE_TESTS=0 -DENABLE_MAN=0   -DENABLE_LLVM_SHARED=1
make -j
sudo make install
cmake -DPYTHON_CMD=python3 .. # build python3 binding
pushd src/python/
make
sudo make install
popd
- Install
bpftrace
sudo apt-get install -y bison cmake flex g++ git libelf-dev zlib1g-dev libfl-dev systemtap-sdt-dev binutils-dev
git clone https://github.com/iovisor/bpftrace
mkdir bpftrace/build && cd bpftrace/build;
cmake -DCMAKE_BUILD_TYPE=Release ..
make -j
sudo make install